

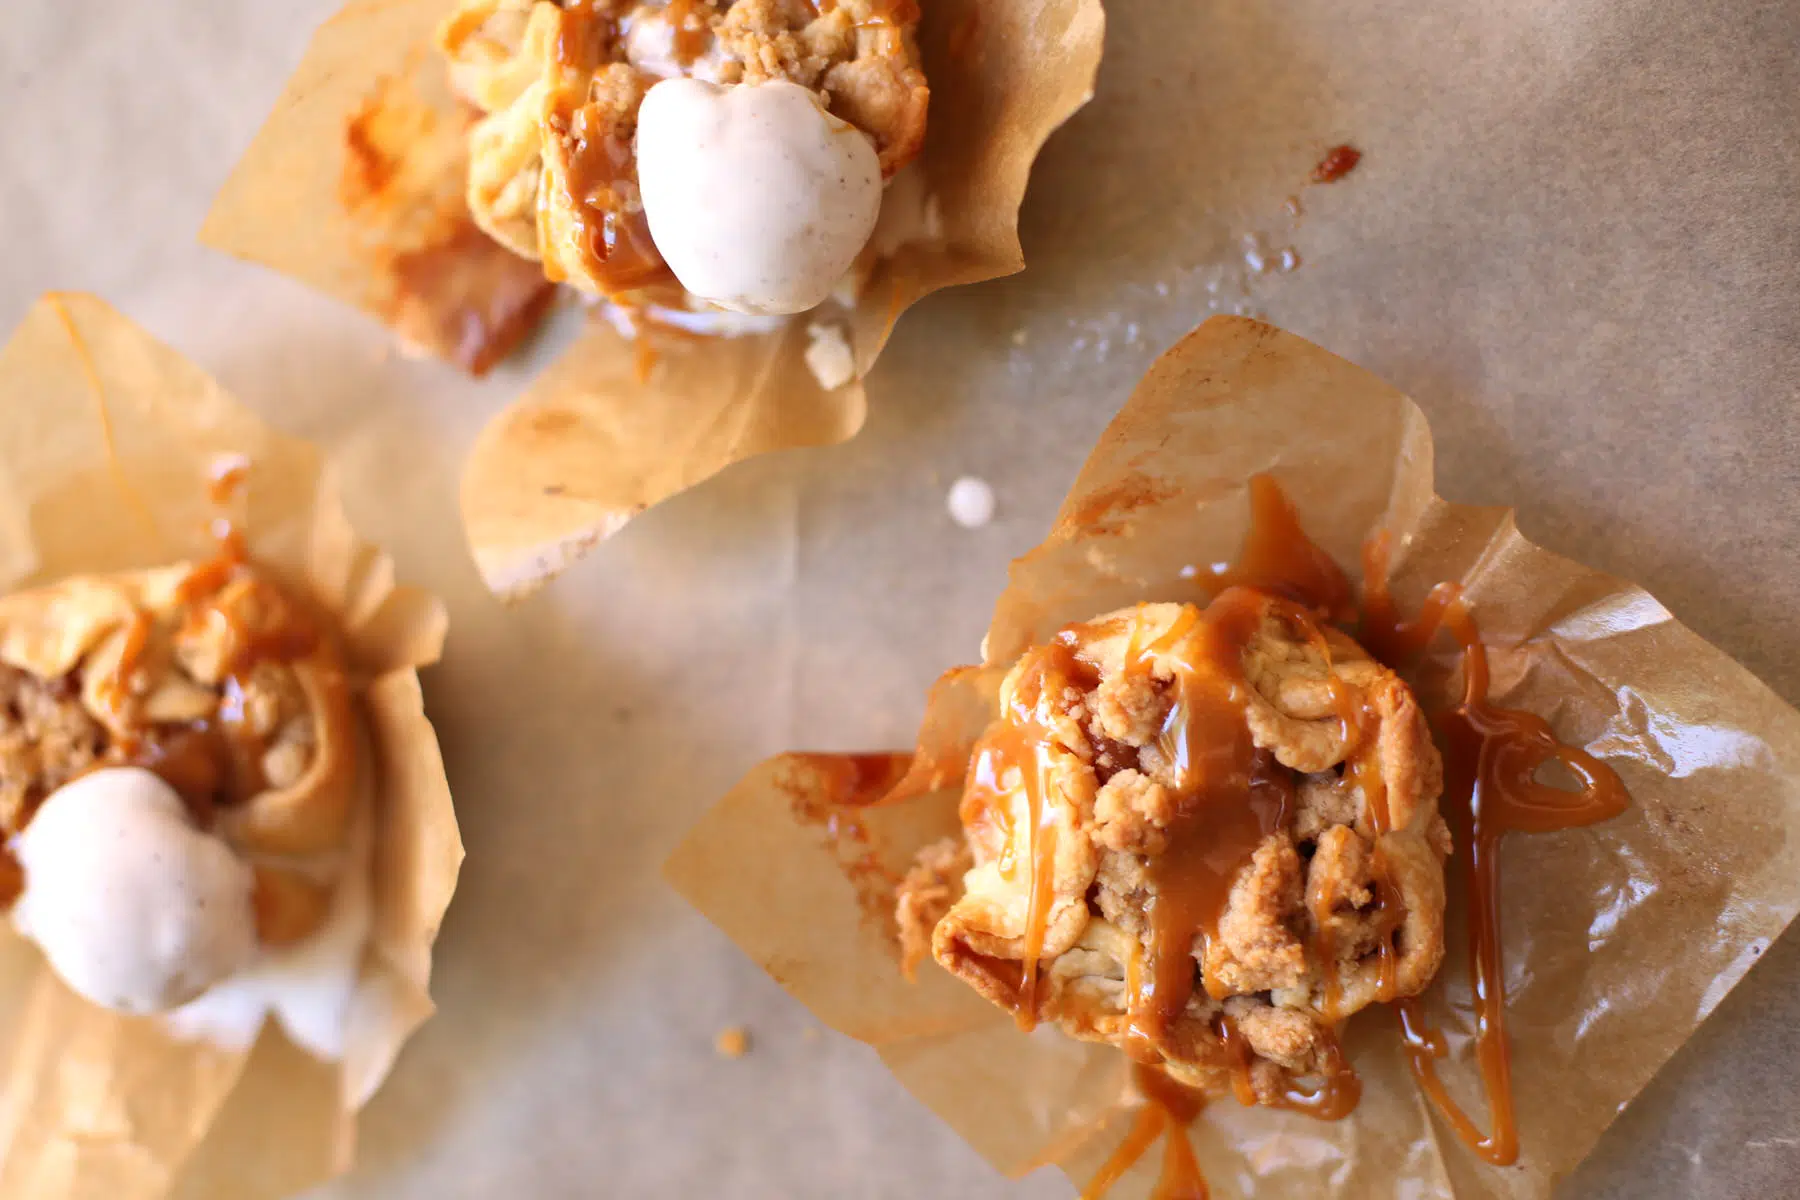
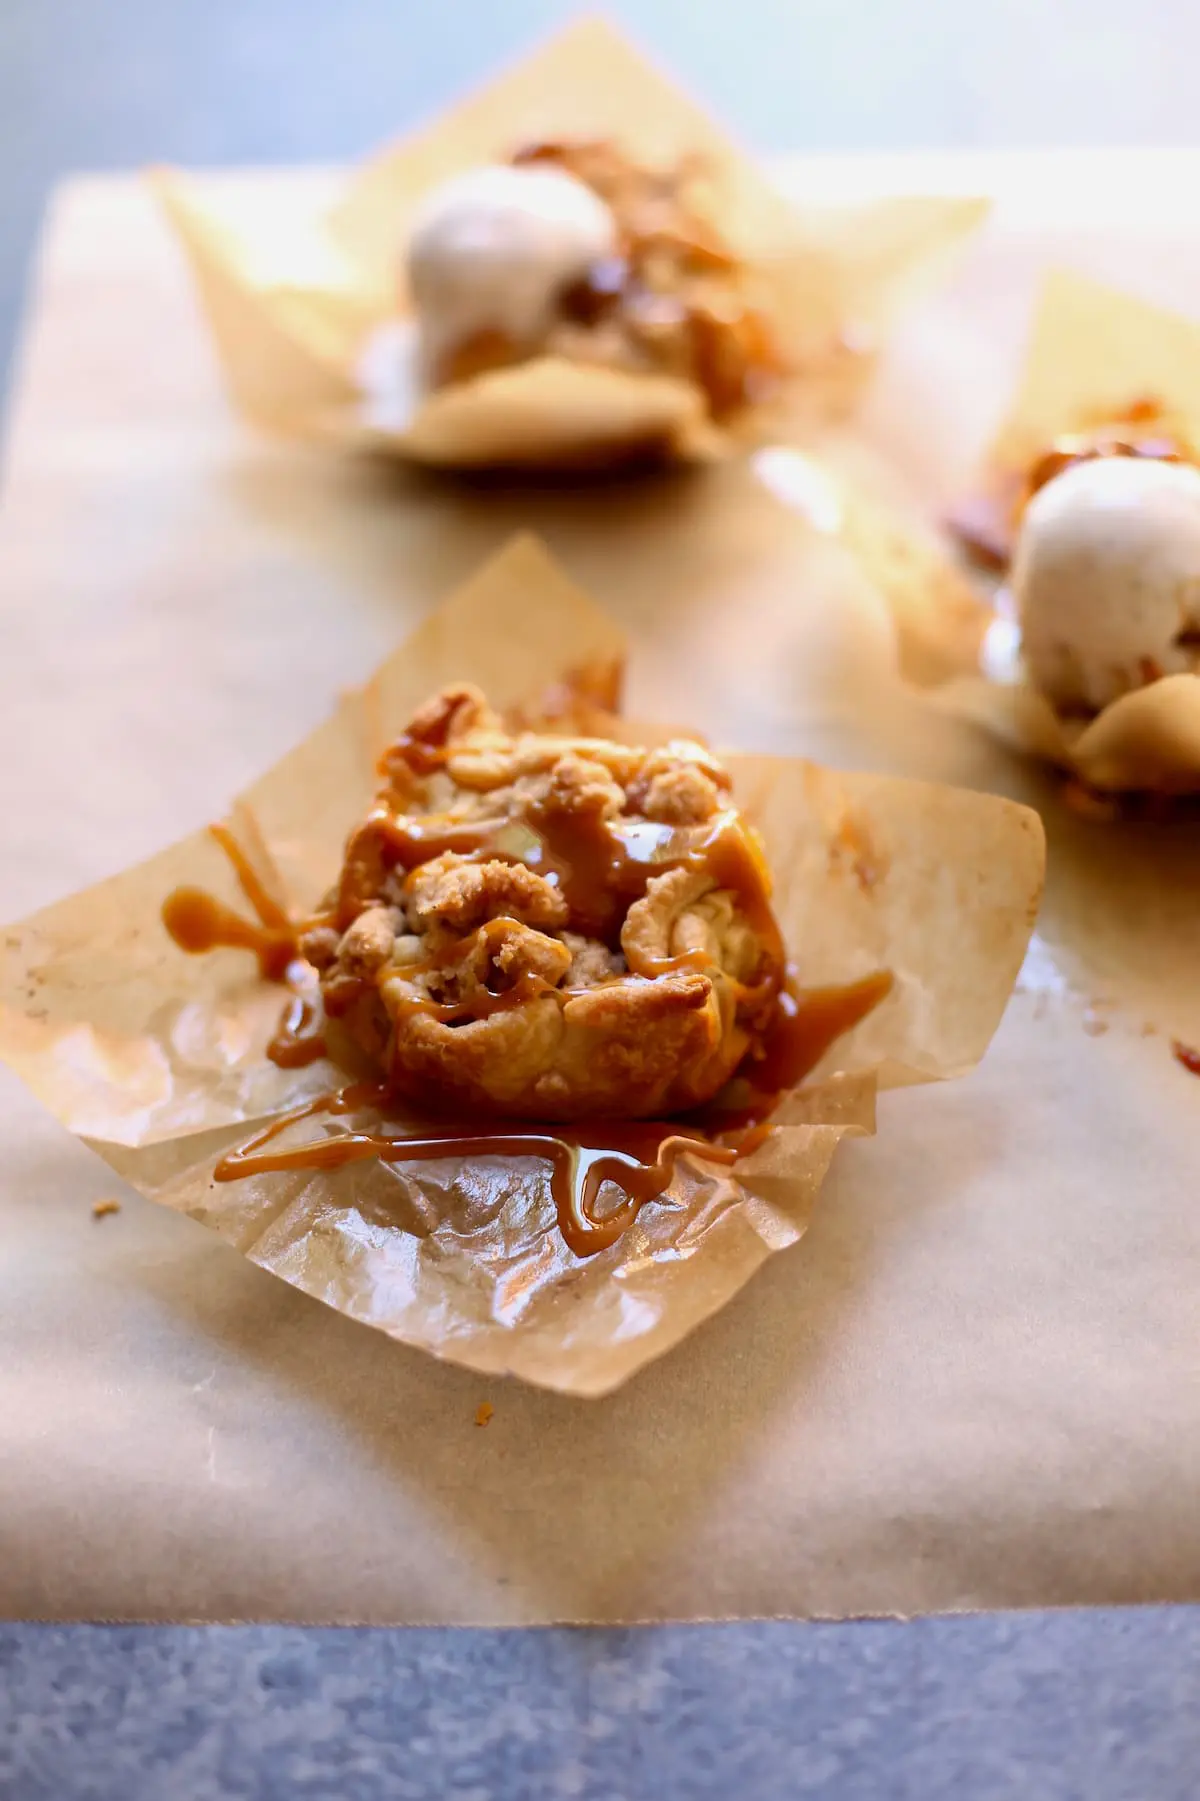
Who doesn’t want their own little dessert? Mini Caramel Apple Pies use a couple of great shortcuts, and are heavenly served warm with a scoop of vanilla ice cream.
Jump to:
Why Make this Recipe?
There is nothing in the entire world that says “home” like a warm piece of salted caramel apple pie. On chilly days, a good cup of Creamy Pumpkin Soup and maybe a Celery Salad with Hazelnuts or Superfood Salad makes for a great meal before tucking into one of these absolutely delicious little pies.
It’s practically mandatory to serve some kind of apple dessert in fall and winter (but great year-round too) so here’s a great recipe and fun take on apple mini pies to add to your repertoire:
- This recipe uses two shortcut ingredients, refrigerated pie crust and store bought caramel sauce. Yay for this!
- These pie bites are always a huge hit with everyone, and the flavors are warm and caramel-y and so, so good.
Another seasonal favorite you might like for dessert is a Pumpkin Spice Milkshake, dairy optional. Delicious!
Ingredients You’ll Need
For full details about the ingredients, please scroll down to the recipe card.
One of the best parts of this recipe is we’re using two big shortcut ingredients for these delicious little Muffin Tin Caramel Apple Pies.
- Refrigerated pie crust: Roll out over a lightly floured surface.
- Caramel Sauce: Any store-bought caramel sauce will do. You’ll gently warm it in the microwave before spooning it over the pies.
- Apples: For the apple pie filling, use slightly tart Granny Smith apples or the less tart Golden Delicious cut into small chunks so they fit easily in the muffin tin.
- Kitchen Staples: Butter, salt, a half cup sugar, all-purpose flour, cinnamon, salt and vanilla extract are all needed for this recipe.
Step-By-Step Instructions

- Prep your apples by peeling them, then quartering them, then cut the quarters length-wise.
- Cut the length-wise pieces with a sharp knife into rough two-inch pieces.
Cook the Apples, Make the Crumb Topping
Please see the recipe card below for step-by-step instructions on each process.
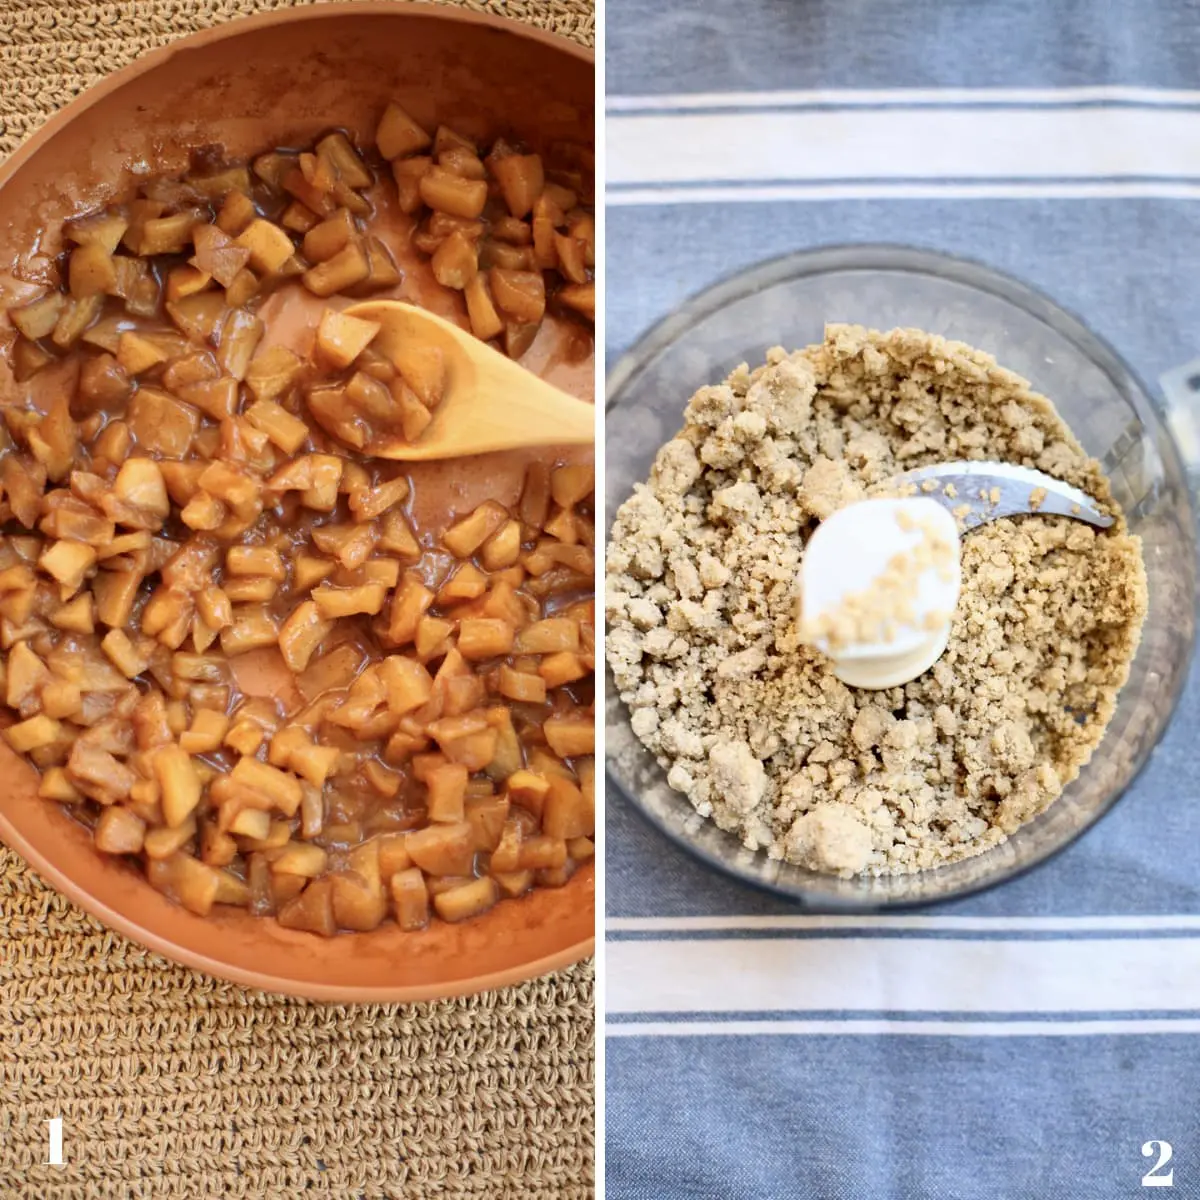
- Cook the apple slices with the butter, salt, water, sugar, cinnamon, nutmeg, lemon juice and vanilla extract until golden brown, they’ll be soft with a little bit of syrup left in the pan. It’s very important to completely cool the apples before proceeding. Otherwise the pie dough will fall apart as you (try in vain) to assemble the pies.
- Use medium-high heat to cook until the water evaporates from the pan and the apples are golden and fork tender. The length of time will vary depending on the ripeness of your apples, about twenty minutes total. If the water evaporates and the apples aren’t fully cooked, just add more water, a half cup at a time until soft.
- Taste the apples to for sweetness, and feel free to add a bit more sugar if needed, but note the crumb topping and caramel sauce will add sweetness too, so shoot for a slightly tart outcome on the apple step.
- Make an easy crumb topping in a food processor for the top of the pie. Just whiz together cold butter, flour, brown sugar, salt, and cinnamon then set aside in a small bowl. You can also use two butter knives or a pastry cutter for this job.
Assemble the Pies
- Cut a large piece of parchment paper into rough five-inch squares, this doesn’t need to be exact, and go for a rounded edge if you can.
- Use a little non-stick cooking spray on the bottom of each well of the muffin tin, then also spray the parchment paper. You’ll be placing the pies on the parchment, then setting them in the muffin tin.
- PRO TIP: You must spray the muffin pan (to make the parchment paper stick) and the parchment paper that you’re going to set the pie on (otherwise the pie will stick to the paper).
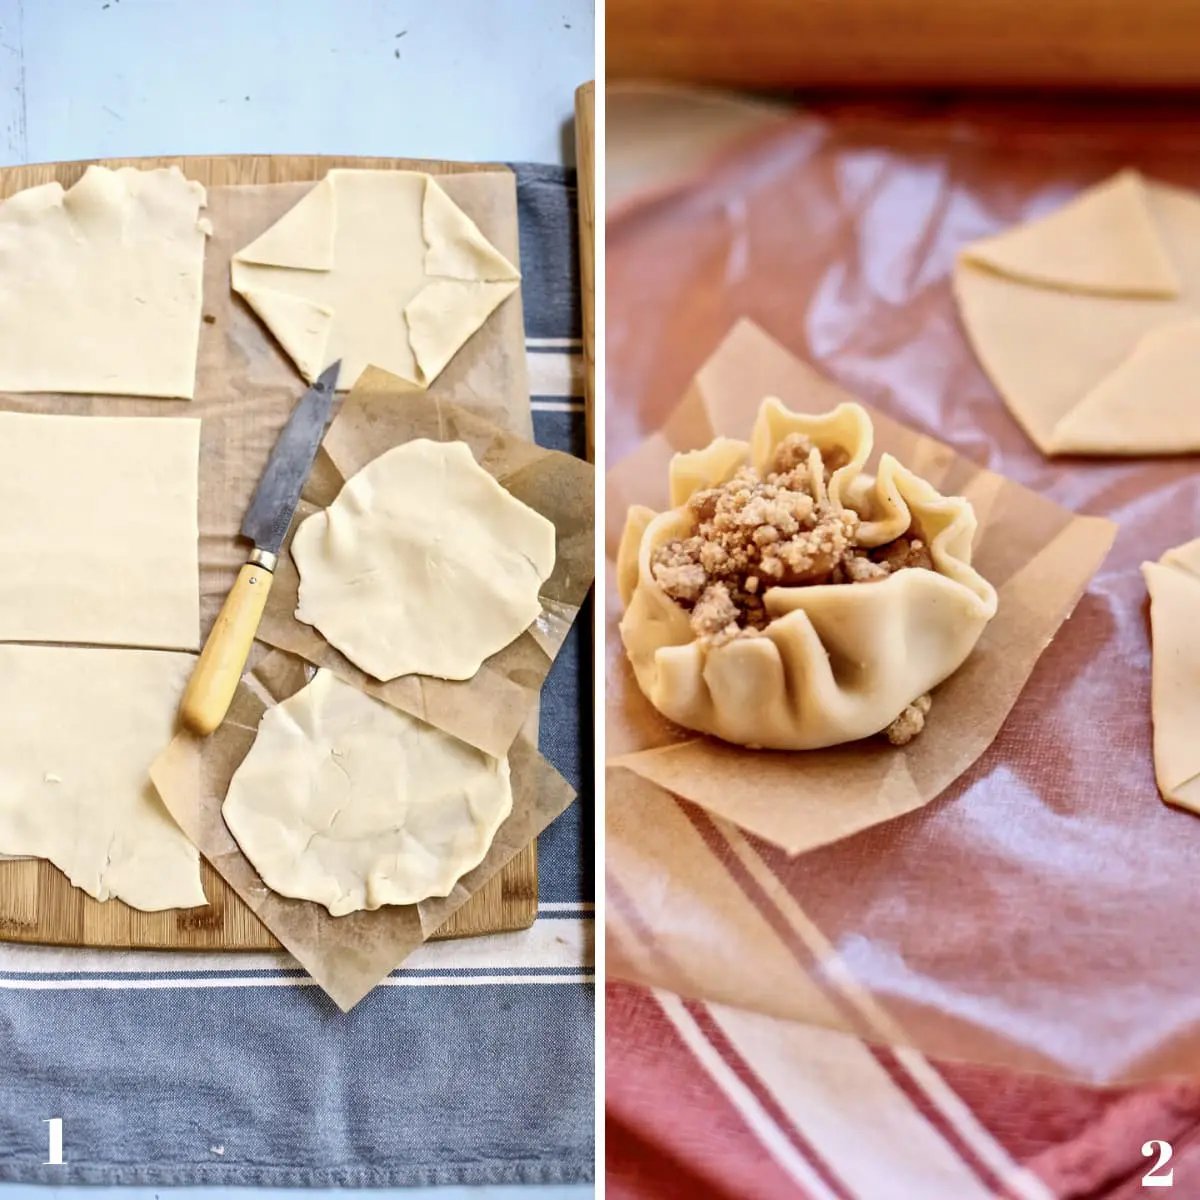
- Roll the pie crust to an approximate 12″ x 12″ rectangle, then cut into six pieces. Fold the pointy edges in toward the center, then press the seams together to make a rounded edge.
- Spoon the cooled apples in the middle of each crust, followed by a generous tablespoon of the crumb topping.
- Gather the pies into a little purse, starting with the edges and using both hands to keep the pie together before carefully transferring to the parchment paper square. Carefully set the bundle into the muffin tin.
- Set the muffin tin on a large baking sheet (cookie sheet) and bake.
These don’t need to look perfect, because they’ll look rustic and fabulous and taste absolutely delicious when they’re done.
Bake the Pies
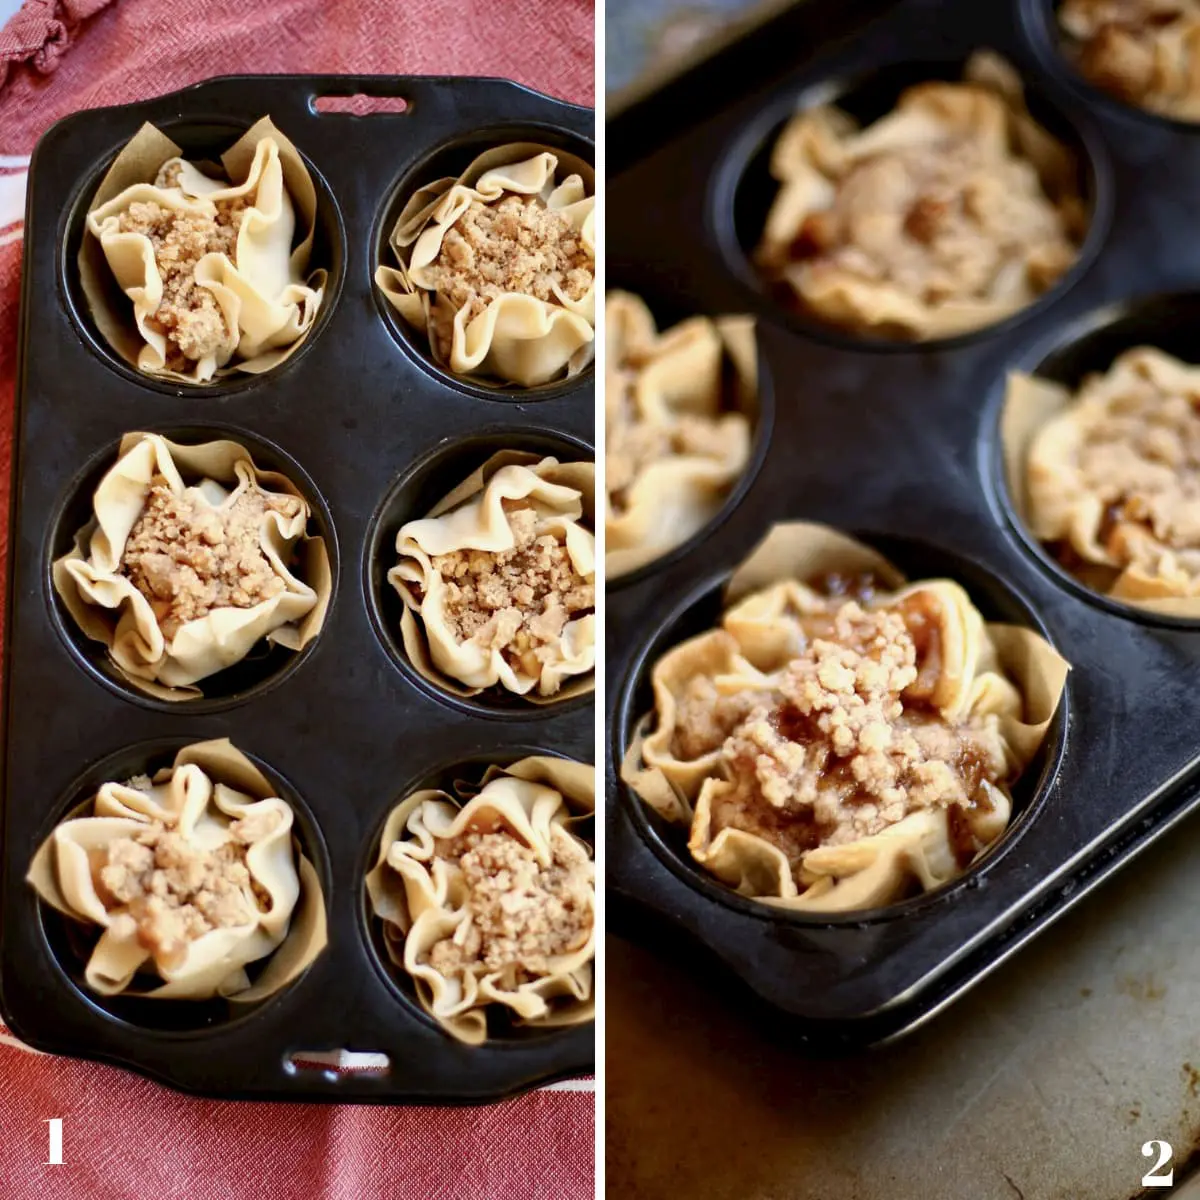
- The left shows what the pies look like unbaked. See how I gathered each pie individually and carefully set it in each muffin cup?
- The right photo shows how they look just out of the oven. Be sure to wait 15-20 minutes to let them cool in the muffin tin. Then just lift them out by the edges of the parchment paper and serve with warm caramel sauce and ice cream.
Expert Tips and Serving Ideas
- When cooking the apples for these pie cups, use medium heat until the water evaporates from the pan and the apples are golden and fork tender. The length of time will vary depending on the ripeness of your apples, about 20 minutes total. If the water evaporates and the apples aren’t fully cooked, just add more water 1/2 cup at a time for a few additional minutes until they are soft.
- Use pure vanilla extract, and Trader Joe’s Pure Bourbon Vanilla Extract is one of my favorites.
- SUPER important to let the apples cool completely before assembling the pies. If they’re warm, the pie crust will fall apart and be very hard (impossible) to work with.
- Use a jumbo muffin pan like this.
- I love Trader Joe’s Fleur de Sel Salted Caramel Sauce. Scoop from the jar into a microwave-safe bowl and heat for a few seconds to spoon it over the pies.
- This crumb topping makes more cups than you need, but it freezes beautifully for several months. Use some to make a Summer Fruit Crisp.
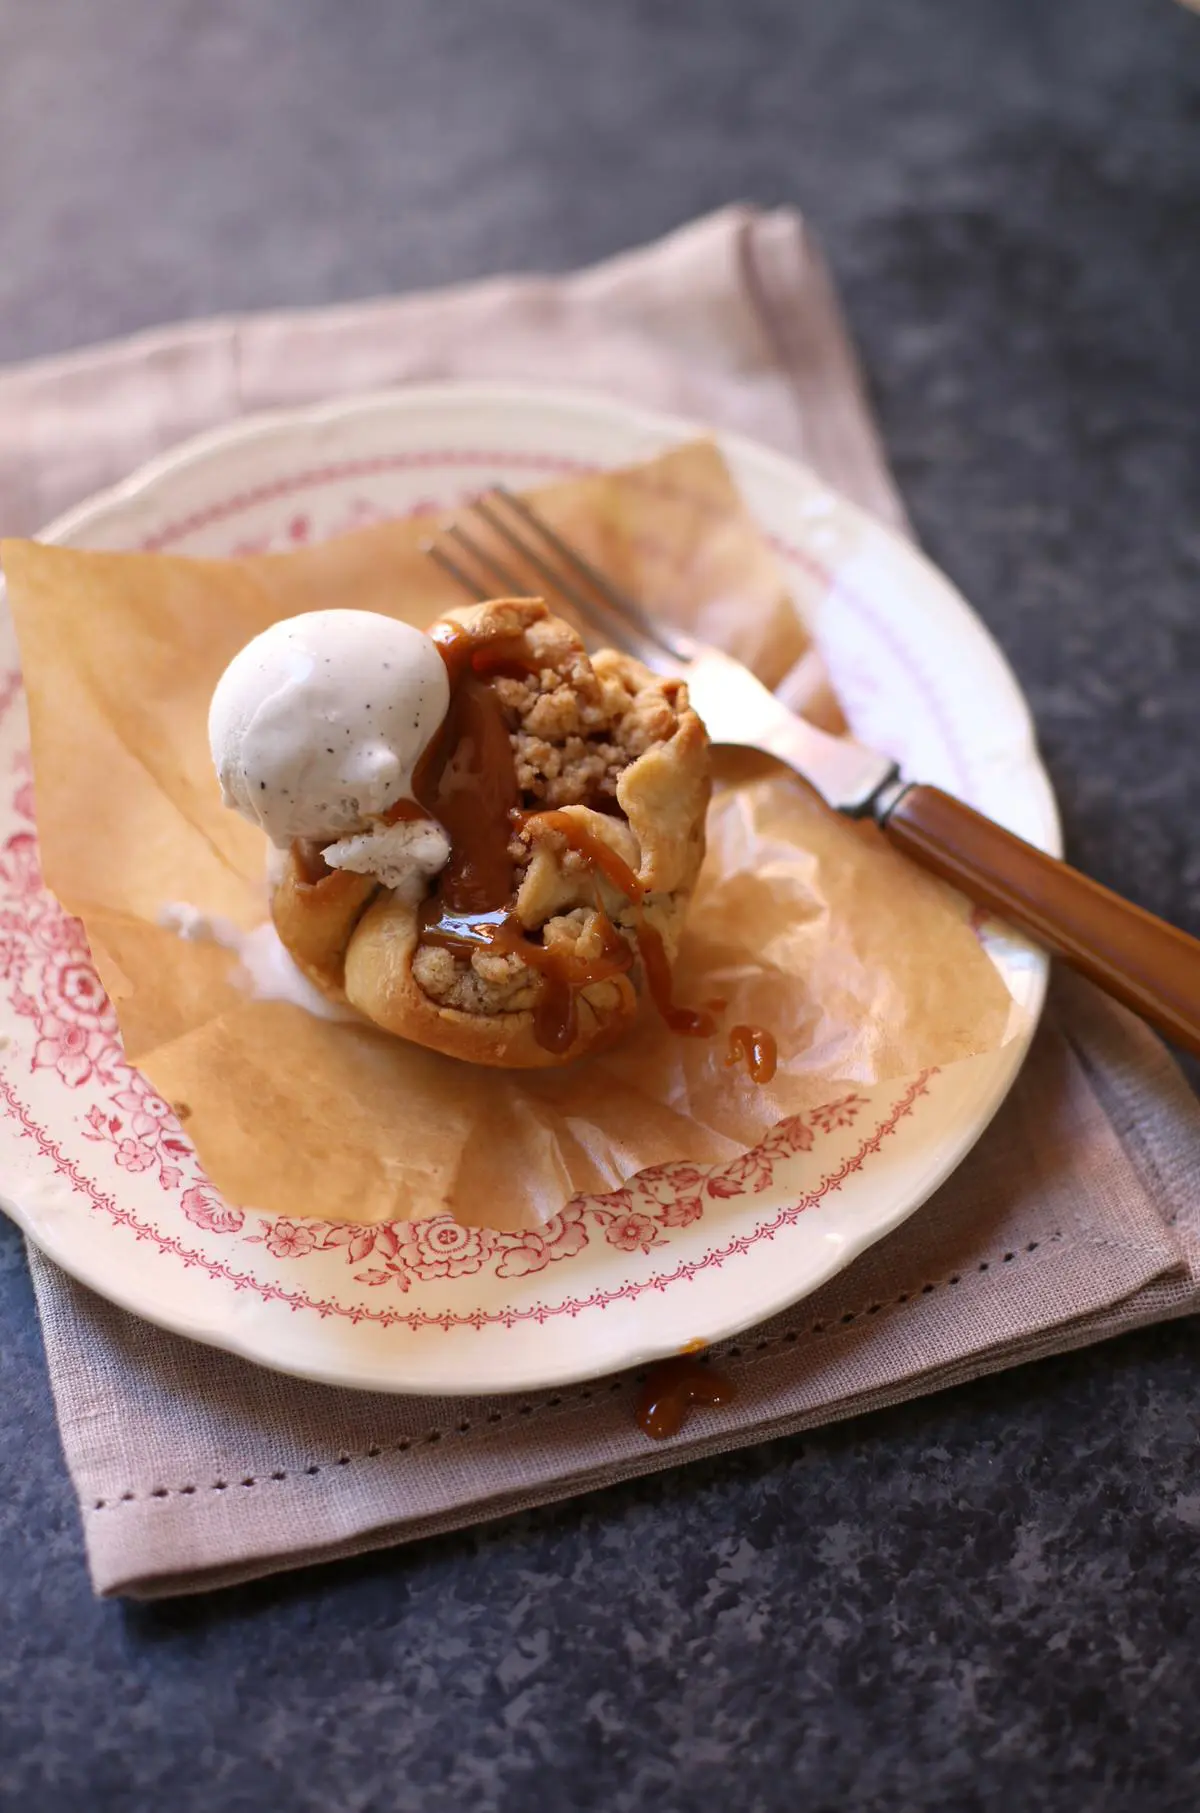
- Vanilla ice cream is practically mandatory for all apple desserts in the world, but you already know that, right?
- A little pitcher of warm caramel sauce is nice to serve alongside a big platter of mini pies, let everyone pour it on themselves!
- Serve these mini caramel apple pies after a casual dinner of Taco Skillet Bake, Turkey Burgers with Pepperjack and Cranberry, or Blackberry Salad with Toasted Hazelnuts.
Frequently Asked Questions
If you don’t have a fresh lemon or find it too obnoxious to cut one for a teaspoon of juice, skip the lemon juice entirely, but it does add a nice balance to the sweetness of the pies.
Taste the apples to for sweetness, and feel free to add a bit more sugar if needed, but note the crumb topping and caramel sauce will add sweetness too, so shoot for a slightly sweet outcome on the apple step. Note that Granny Smith Apples are more tart than Golden Delicious apples too.
A scoop of vanilla ice cream with caramel topping or any vanilla non-dairy ice cream is perfect. Try whipping cream instead too.
More Recipes to Try
- Mini Strawberry Pies Recipe: Easy and delicious.
- Easy and Fun Halloween Fruit Snacks: Something for everyone here, so cute!
- Baked Apples with Oatmeal Crumble Topping: A wonderful, homey apple dessert or breakfast.
- White Chocolate Peanut Butter Cups: Beautiful and super fun to make too.
- Roasted Nectarines with Caramel Sauce: Tastes as good as it looks.
- Cantaloupe with Ice Cream: And most importantly, caramel sauce too!
- Apple Upside Down Cake: One of my very favorite cakes, so good.
- Waffles with Spiced Apples: Yummy any time of year.
If you’ve made Mini Caramel Apple Pies or any recipe on Studio Delicious, leave a recipe rating and tell me all about it in the comments below!
Looking for more tips and fresh, homemade recipes? Join my email list, tag and follow me on Instagram using #studiodeliciouseats, follow my boards on Pinterest, and see what I’m up to on Facebook and Twitter!

Mini Caramel Apple Pies
Ingredients
- FOR THE APPLES
- 6 Golden Delicious (or Granny Smith) apples peeled and cut into half-inch chunks
- 2 tablespoon Butter, unsalted
- ⅛ teaspoon Kosher Salt
- ½ cup Water
- ½ cup Sugar
- 1 teaspoon Cinnamon
- ¼ teaspoon Nutmeg
- 1 teaspoon Lemon Juice, freshly squeezed
- 1 teaspoon Vanilla extract
- FOR THE CRUMB TOPPING
- 1 stick (½ cup) Butter, unsalted and chilled, cut in cubes
- 1 cup Flour
- ⅓ cup Sugar
- ¼ cup Brown Sugar
- ½ teaspoon Kosher Salt
- ½ teaspoon Cinnamon
- 1 tablespoon Caramel Sauce, store bought store bought in a jar, see tips for recommendation.
- 1 roll Refrigerated Pie Crust (from a 14-ounce box) Usually sold in a box of two rolls, you'll need one roll (approx. 7 ounces each.)
- Non-stick baking spray Spray the inside of the parchment paper before adding the pies or they will stick!
Instructions
- MAKE THE APPLES
- Cook the apples by melting the butter in a large non-stick skillet over medium heat, then add the cubed apples. Use a wooden spoon to toss and coat the apples, then increase to medium-high heat and cook for two minutes, just until the apples sizzle and soften, being careful not to brown them.
- Add the salt, water, sugar, cinnamon and nutmeg to the apples and stir to combine. Cook until fork tender and lightly golden and the liquid absorbed but some syrup is left on the bottom of the pan, about twenty minutes total. The length of time will vary depending on ripeness of your apples. If the water evaporates and the apples aren’t cooked, add water a half-cup at a time and continue to cook until it evaporates and the apples are tender. When finished, add the lemon juice and the vanilla extract and stir to combine. Transfer to a bowl and cool completely in the refrigerator before assembling the pies.
- To make the crumb topping, add butter, flour, both sugars, salt and cinnamon to a food processor and pulse until the ingredients come together to form a crumble that holds together when you gently squeeze it in your hands. Alternatively, use two butter knives or a pastry cutter to cut and combine the butter into to the dry ingredients until the mixture is completely combined and it holds together when lightly squeezed. (This makes a bit more than you'll need, so freeze the rest in a well-sealed container for up to six months.)
- To assemble the pies, preheat oven to 350˚F degrees. Take a large piece of parchment paper and cut into six squares approximately 5 inches each. Spray the inside of the muffin tin well with non-stick baking spray. Next, spray the parchment squares with non-stick spray, and then assemble the pies. On a lightly floured surface, use a rolling pin to shape the pie dough into a rectangle approximately 12" x 12” in size. Use a knife to cut the dough into six even pieces, then fold the pointed ends of each piece inward in to make the dough rounded. These don't need to be perfect!
- To assemble each pie, spoon a ¼ (quarter) to a ⅓ (a third) cup of cooled apples on top of each dough round. Next, sprinkle a rounded tablespoon of the crumb topping on top of the apples. Make each pie into a bundle by gathering the edge of the dough toward the middle and gently pressing dough together to a purse. Set each pie on top of a prepared parchment square. Transfer the pies to the muffin tin by lifting the edges of the parchment paper and then setting each pie into the prepared tin.
- TIP: While it may be tempting, don't gather the pie and the parchment square together and then place it in the tin. Why? The pie crust will bake into the crevices of the parchment paper and the pies won't release from the pan. Simply bundle the pies separately and set them on the sprayed parchment paper squares, and then transfer to the muffin tin by lifting the edges of the parchment paper. It makes a difference!
- To bake the pies, place the muffin pan on a large baking sheet, and bake for 30-35 minutes until edges of the crust and crumb topping are lightly browned. Remove from oven and let cool for twenty minutes. Lift each pie out of the tin and carefully unwrap from the parchment paper.
- For serving, spoon a generous tablespoon of warmed caramel sauce on top with a scoop of vanilla ice cream if desired.
Notes
- When cooking the apples for these pie cups, use medium-high heat until the water evaporates from the pan and the apples are golden and fork tender. The length of time will vary depending on the ripeness of your apples, about twenty minutes total. If the water evaporates and the apples aren’t fully cooked, just add more water, a half cup at a time until they are soft.
- Use pure vanilla extract, always when baking.
- Super important to let the apples cool completely before assembling the pies.If they’re warm, the pie crust will fall apart and be very hard (impossible) to work with.
- To heat the caramel sauce, scoop it from the jar into a microwave-safe bowl and heat for a few seconds to spoon it over the pies.
- This crumb topping makes more cups than you need, but it freezes beautifully for several months. Use some to make a Summer Fruit Crisp.
- Vanilla ice cream is practically mandatory for all apple desserts in the world, but you already know that, right?
- A little pitcher of warm caramel sauce is nice to serve alongside a big platter of mini pies, let everyone pour it on themselves!
Nutrition
- Super important to read the whole recipe before you begin
- Pay attention to the ingredient list and photos for the recipe
- If possible, prep your ingredients a little before you start
- Always use a sharp knife for safety
- Use the size of pan called for in the recipe
- For savory recipes, taste and season as you go
- Buy fresh, organic ingredients, locally sourced whenever possible
This post was updated in September, 2024 with improved text and recipe instructions.

This is such a great idea! I love individual size desserts! The tips on using the store bought crust and sauce is such a time saver!
Yep, and thanks!
Thank you! 🙂
Mini desserts are the best and these little pies are so good. Great for Thanksgiving so everyone can try all the desserts!
Exactly!
Thats what I think too…thanks 🙂
These were really good!! Everyone at my house loved it!
Yay for that!
They are the best! Thanks
mmm yes, please!! These look so amazing! Such a fun idea too, a great twist on a classic apple pie.
Thanks so much!
Thank you 🙂
Soo sooo good. These are perfect dessert ideas for the holidays.
Thank you 🙂
These came out so good, especially the caramel topping was absolutely decadent and complimented the pie so well.
I made your Muffin tin caramel apple pies and they are not only amazing but adorable. My family loved them , the warm cinnamon spiced filling was perfect. This is a keeper , it will be filed in my recipe box under favorites.
Oh how cute do these look! I absolutely love how they are so small and bite size because that would so much less messier. They look absolutely delicious and I have no doubt my kids would go crazy over these.
Thank you and enjoy!
These are so cute and such a great mandatory apple fall dessert! It was a great way to switch it up from the regular ol’ apple pie! My girls thought they were so fun and I loved the built in portion control! 😉
Right? Thank you! 🙂
These are so adorable and look delicious! I can’t wait to give them a try! Thanks for sharing
Thank you…:)
My kids are going to love it. This is super delicious and I just love the toppings. Yum. Caramel seems to be the Icing on the cake.
haha…thanks
This looks really delicious and seeing this makes my sweet tooth happy, yum!
Thanks 🙂
Oh my gosh I can’t wait to make these for the holidays. Who doesn’t love their own individual dessert? Look delicious!
Hope you enjoy! 🙂
This is just the recipe for this moment, So practical and so much flavour. Thank you My entire family loves Apples and this is so practical in a muffin tin!
These are such an adorable idea! Their cuteness was the reason I made them, but their deliciousness is the reason I’ll be making them again! So, so good! Thanks for a great recipe!
Great, thanks and glad you enjoyed them!
Great! Thanks for sharing!:)
This sounds great but i am really confused by part of the instructions. Can you help me please?
Next, add a rounded tablespoon of crumb topping on top of the apples, then carefully gather each corner of the pie corners together into a bundled “purse” and transfer one at a time to the muffin tin, setting each pie top of a square of the sprayed parchment paper. To place them in the muffin tin, carefully lift each pie from the parchment paper corners, then set into each muffin tin.
Thanks for your feedback! I went in and made the instructions clearer. It would be so appreciated if you could adjust the star rating given, and thanks again!